There are two types of assignment you can be asked to submit in iLearn: a Turnitin assignment and an iLearn assignment.
Turnitin assignment
Turnitin is an online text-matching software that compares submitted papers to databases of academic publications as well as other papers that have been submitted.
Feedback Studio
It is a product within Turnitin used by your teachers to grade and provide overall feedback on your assignment submissions.
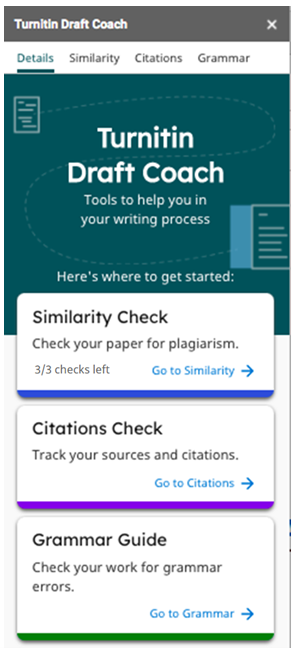
Turnitin Draft Coach
Turnitin Draft Coach gives you access to Turnitin Similarity Reports, Citations Reports, and Grammar Guide right where you do your work — directly in Google Docs when logged in with your MQ Student email and OneID.
This means that you can draft your work in Google Docs (or copy and paste it into Google Docs from another word processor) and then use the information in Turnitin Draft Coach to help you improve your writing prior to submitting a final copy to your teacher.
The Turnitin Draft Coach add-on is meant to help you navigate the issues of similarity, plagiarism, and grammar as you write and revise your assignments.
Access and submit a Turnitin assignment
There are two types of Turnitin assignments in iLearn.
File upload
To make a submission for this type:
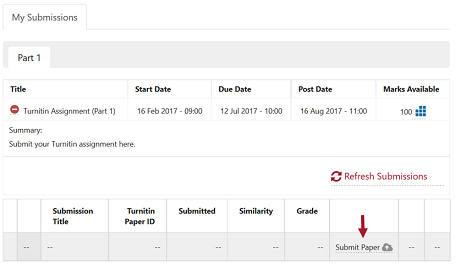
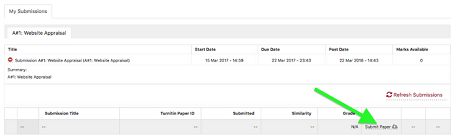
Click on the Turnitin assignment link.
An overview of instructions for the Turnitin assignment will be provided. Click Submit Paper.
Enter a Submission Title. Include your student number here unless otherwise specified by your lecturer.
Click on the Add icon and on Browse to select your file to upload. The paper being submitted must contain more than 20 words, must be under 40MB (or approximately two million characters), must not exceed 400 pages in length, and must not contain spaces in between every letter (l i k e t h i s).
Tick the checkbox to agree to the conditions of submission.
Click Add submission.
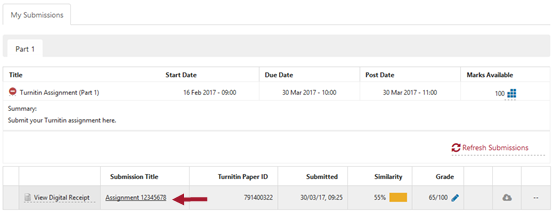
The screen will now show that your assignment has been successfully submitted. You will also receive a confirmation email sent to your @students.mq.edu.au email address.
Click Close in the top right corner.
Depending on how your lecturer has set up the assignment, you may or may not be able to view your similarity report or resubmit your paper multiple times.
If your lecturer has allowed you to resubmit your paper, you can see similarity report instantly for the first assignment submission and up to three resubmissions (total of 4 submissions).
You need to wait for approximately 24 hours to see the similarity report from the fifth resubmission onwards.
When you can resubmit up until the due date, submit as you normally would.
After you have made a submission if your lecturer has allowed resubmissions.
When you resubmit from the fifth resubmission, Turnitin can take up to 24 hours to generate a new similarity report. During this time, it will show as pending.
Access results and feedback from a Turnitin assignment
You will be able to access your assignment results and feedback through the iLearn unit once the Turnitin assignment Post date has been reached.
Click on the assignment link either in the week/topic or in the Activities block.
Feedback Studio is a product within Turnitin that allows teaching staff to grade and provide feedback for student assignments online.
If your lecturer is using Feedback Studio to provide feedback on your assignment, you can access this under My Submissions within the Turnitin assignment.
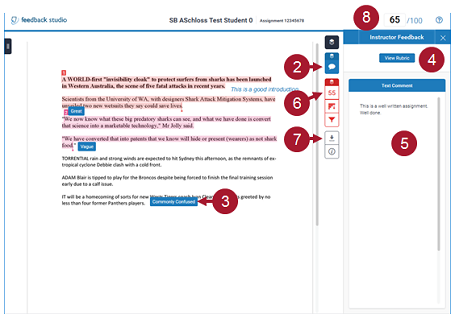
Click on the name of your submission to open the Turnitin document viewer.
Click on the Instructor Feedback icon to view all the quick mark comments on your paper.
Click on each individual blue quick mark to view the full comment.
Click on View Rubric to view any marking rubric if available.
The Text Comment field is overall for your assignment.
Click on the Match Overview icon to view your similarity report (if made available by your lecturer). The similarity report shows an overview of text matches identified and the sources of the matching text. For more information on understanding the similarity report and improving your academic writing skills, visit the MQ Academic Integrity module.
To download your feedback, click on the Download icon . If you would like to download feedback from your teacher and similarity report, make sure both icons are pressed and select Current View. You can also download a copy of your digital receipt and the paper you originally submitted.
Your grade will appear in the top right-hand corner.
Access Turnitin Draft Coach
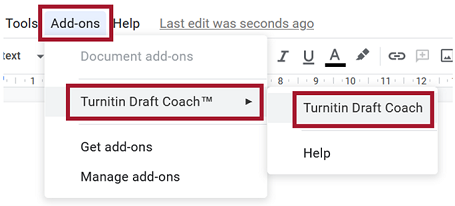
Login into Google Docs with your MQ OneID and draft as your assignment as you normally would. You need to login with your MQ Student email and OneID to access the Turnitin Draft Coach Add-on.
Click on Add-ons and select Turnitin Draft Coach and Turnitin Draft Coach again.
This will bring up the Turnitin Draft Coach panel at the right side of your screen. Here you will be able to identify issues with similarity, citations, and grammar while you draft. To identify similarity, citations and grammar issues, click on Go to Similarity, Go to Citations, or Go to Grammar and then follow the prompts accordingly.
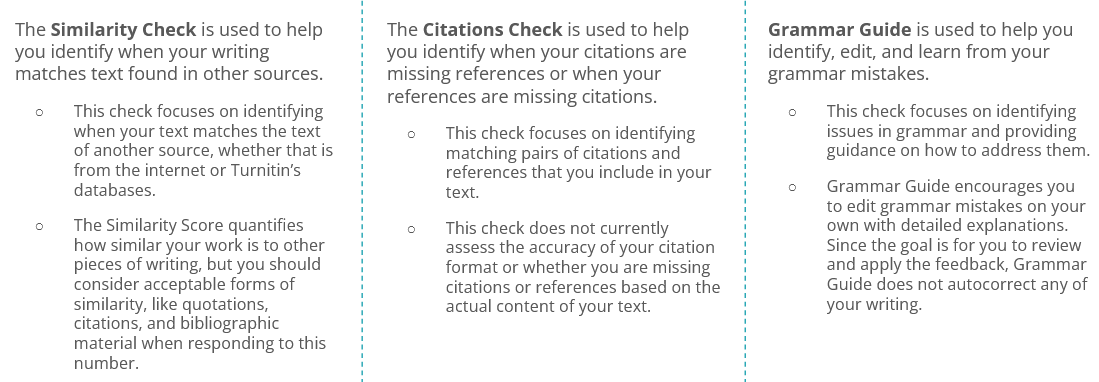
How do Similarity Check, Citations Check, and Grammar Guide differ?
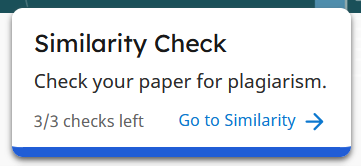
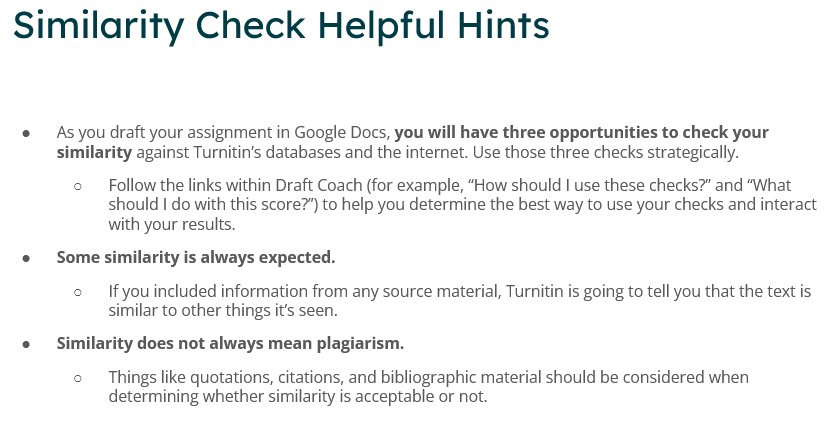
When you have finished your draft, run a similarity check on your paper to see if it matches existing content in Turnitin’s Database. You have a maximum of 3 checks per paper.
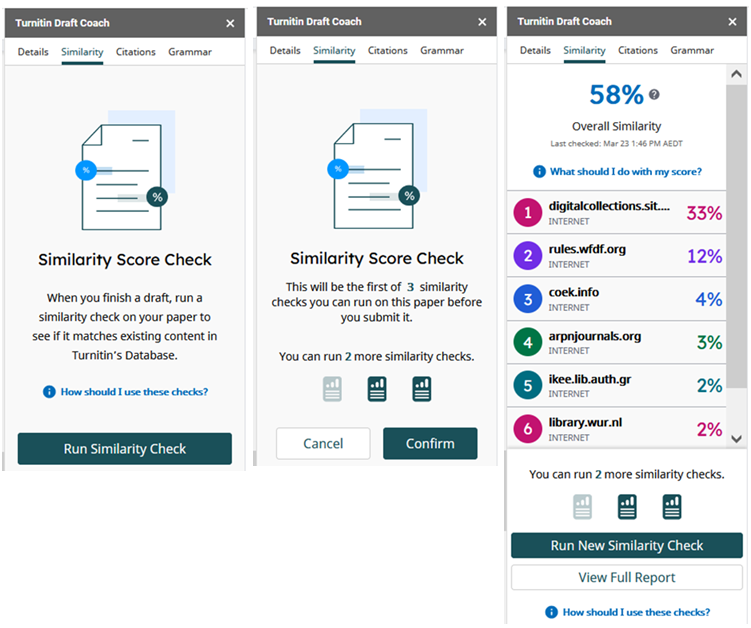
To start your Similarity Check, click on Go to Similarity.
Click on Run Similarity Check and you will be prompted with the number of similarity checks you have remaining. Click on Confirm. Do not alter your text while the check is running as it needs your text to stay the same so it can be marked accurately. Access helpful guidance from Turnitin’s teachers by clicking on the links throughout the add-on, such as How should I use these checks? and What should I do with my score?
Use the information in your Similarity Checks to inform changes that you should make in your assignment. Consider the following when viewing your Similarity Check results:
Only the most significant quotes from source material should be included in your writing.
Summarizations, paraphrases, or explanations in your own words can be used instead of directly quoting from a source.
All evidence must be cited using the appropriate citation style. Consult with your instructor to determine which style is preferred for each assignment.
For a more detailed look at your similarity results, click “View Full Report” (located under “Run New Similarity Check”). The full report allows you to exclude quotes, bibliography, citations, and minor matches from the Similarity Check.
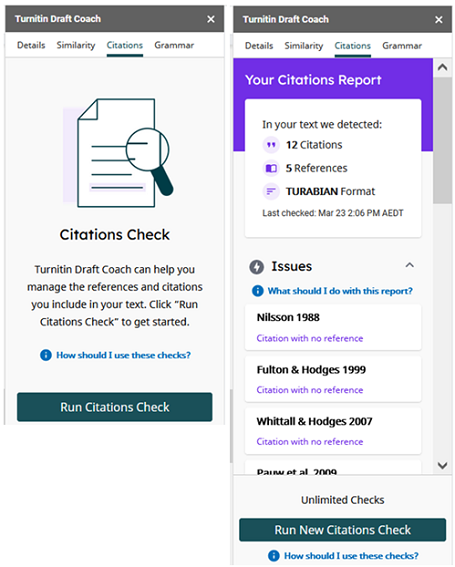
Click on the Citations tab and click on Run Citations Check.
Use the information in your Citations Check to inform changes that you should make in your assignment. Consider the following when viewing your Citations Check results:
All evidence must be cited using the appropriate citation style. Consult with your teacher to determine which style is preferred for each assignment.
Draft Coach currently identifies MLA, APA, and Chicago citations styles. If you are using any other citation styles, they will not be identified.
Each reference listed in your bibliography should have at least one matching citation within your text.
Likewise, each citation within your text should have a matching reference listed in your bibliography. Use the similarity and citations checks as a pair to ensure that your writing is free from plagiarism and ineffective citations. If a similarity match is identified in your Similarity Check, make sure that you include both a citation and reference for your use of that source in your writing.
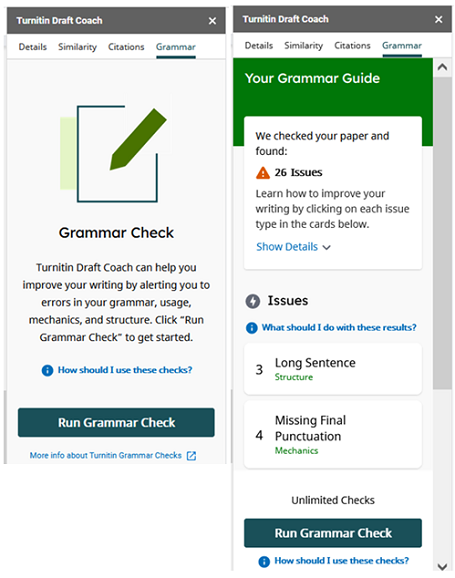
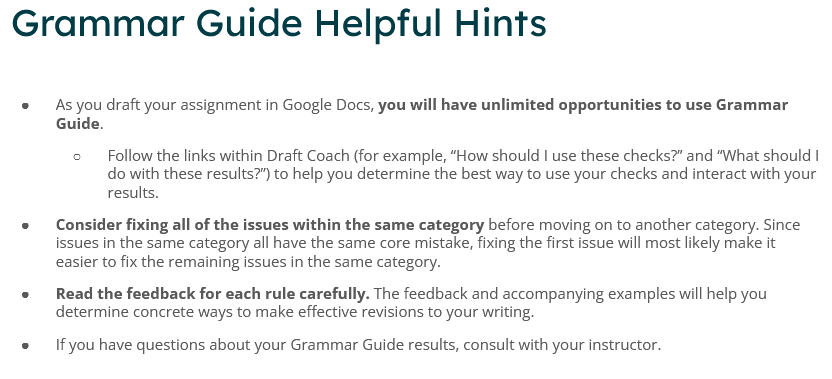
Click on the Grammar tab and click on Run Grammar Check.
Use the information in Grammar Guide to inform changes that you should make in your assignment. Consider the following when viewing your Grammar Guide results:
Grammar Guide provides in-depth instructions to help you make your own edits. It does not automatically correct mistakes for you since the goal is for you to review, reflect, and apply the detailed feedback. This approach leads to better understanding and mastery of grammar concepts.
Grammar Guide identifies issues in grammar, mechanics, usage, and structure. It does not check spelling since Google Docs already covers this.
For very long documents with more than 100,000 characters, consider splitting your draft into separate documents to get feedback from Grammar Guide (which reviews only the first 100,000 characters of a document).
iLearn assignment
An iLearn assignment is where you upload a file to the assignment link within iLearn.
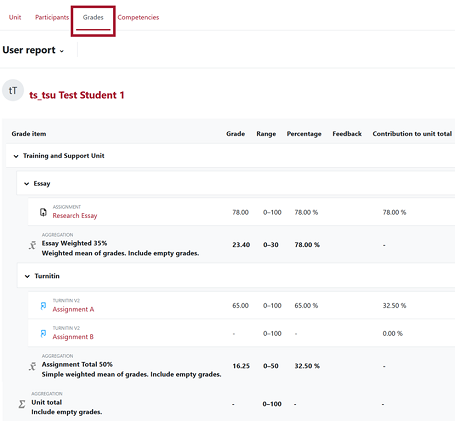
Gradebook
It shows you the grades for each activity you have completed in an iLearn unit. Once the unit convenor has released a grade to students, you will be able to view all of your grades through the iLearn Gradebook.
Find out more about each of these facilities by exploring the quick guides below.
Submit and access feedback from an iLearn assignment
An iLearn assignment is where you upload a file to the assignment link within iLearn.
Submit an iLearn assignment
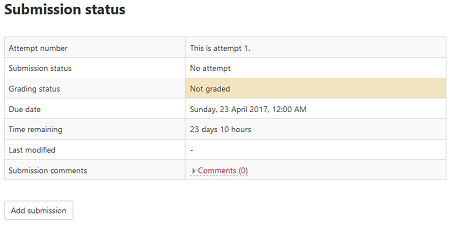
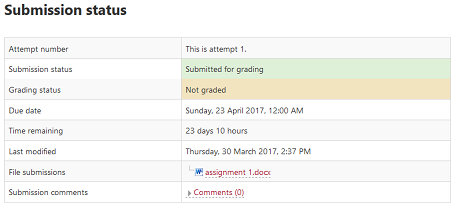
Follow the steps below to make a submission:
Click on the assignment link.
Click on the Add submission button.
Click on the Add icon and click Browse to select the file you wish to submit or drag and drop the file to upload your file.
Click Upload this file.
Click Save changes. You have successfully submitted your assignment.
Access your results and feedback from an iLearn assignment
Once assignments have been assessed, you will be able to access your assignment results and feedback through the unit.
In most cases, you click on the assignment link either in the week/topic or in the activities block. However, depending on how the assignment has been set up you may receive an email notification that contains a link to the results so you can see results that way.
Gradebook
Grades for each activity in an iLearn unit can be found in the iLearn Gradebook.
In Gradebook, the grader report collects items that have been graded from the various iLearn activities that are assessed.
Once the unit convenor has released a grade to students, you will be able to view your grades through the iLearn Gradebook.
To access the Gradebook, click Grades at the top of the page.
Student video submissions
Your convenor may decide to use the Echo360 Active Learning Platform to receive video uploads from students, perhaps for an assignment.
Your convenor will provide you with information on which video sharing method you should use for and where URLs should be pasted in for viewing or grading.
Echo360's Universal capture software is available to students to create screen and webcam recordings for assignment submissions.
Follow the instructions on this page titled Echo360 ALP Universal Capture software installation if you would like to use the software to record.
Method 1 - Echo360 video assignments via iLearn editor
Submitting a video file
Log into your iLearn unit and select an assignment.
Click Add submission.
In the editor toolbar, click the Echo360 icon.
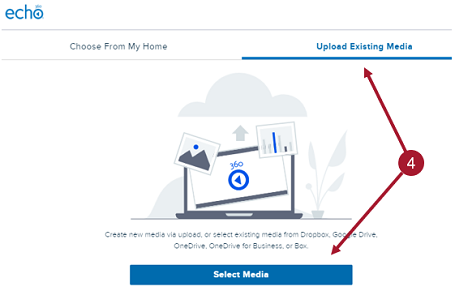
Click Upload Existing Media and click Select Media. Use the options to browse for and select the video file or connect to a storage service if your video file is hosted there.
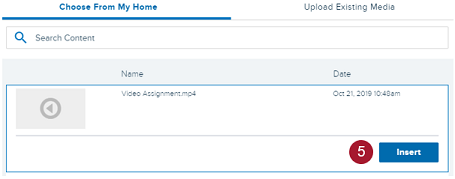
Find the video on the list and click Insert. If you have uploaded videos to Echo360 before or uploaded using Echo360 desktop capture software or the Echo360 app, they will also appear on this list, so take care to identify and insert the correct video.
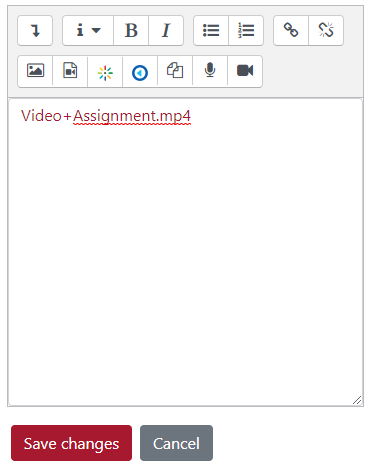
Click Save changes. Do not edit the text contained in the editor.
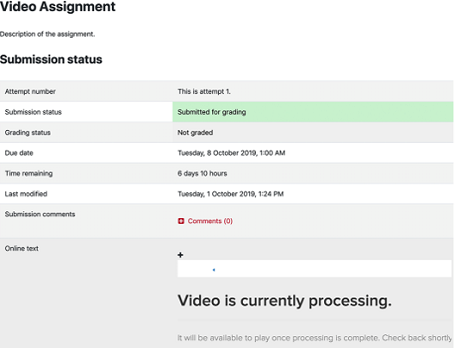
The video has now been submitted for grading.
You can close the tab or return back to iLearn.
You may notice the video is not immediately viewable while it is being processed by Echo360, but rest assured that after a short time it will be visible to your convenor.
If you do wish to see the video after it is processed, you can return back to the assignment page at a later time or refresh the webpage until the video displays.
As a guideline, a video 5 minutes in length may take 5 minutes to process and display, a 30-minute video may take about 30 minutes before it can be played.
Method 2 - Student upload and sharing video via publicly accessible URL
Log into iLearn and access your unit.
Click the Echo360 Active Learning Platform block link.
Within the Active Learning Platform, click on Library the Create in the top left.
Click Upload Media.
Select a video file from your computer to upload. Wait for upload and processing to complete.
Click My Content.
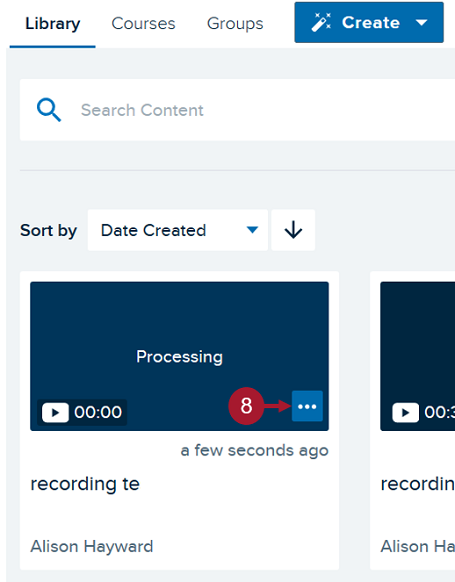
Click the thumbnail for the video just uploaded. You can complete the following steps even whilst the video is being processed.
Hover your mouse over your uploaded video and click on the 3 dots and select Share.
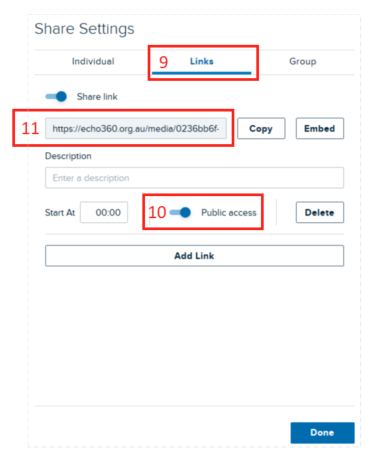
Click the Links tab and click Add Link.
Ensure Public access is enabled.
Click the Link URL to copy it. The URL can be pasted anywhere as instructed by the convenor such as a forum (for other students to view) or in an assignment submission (for formal grading) or emailed.
Media collection assignment
You could be asked to submit a media collection as an assignment as a single student or as part of a group assignment. You can create a gallery of related media items that include video, audio, image and document file types. The media collection can be submitted to a linked Assignment activity.
For a Media Collection assignment, you first need to create the Media Collection and then you need to link the collection to an assignment.
Access and submit a media collection
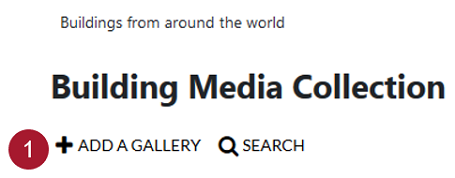
Click on the Media Collection link and click Add a Gallery.
Enter a Gallery name.
Select a Gallery mode which defines the kind of content the gallery supports from the options of Standard or YouTube. In Standard mode, you can add any kind of media content. In YouTube mode, only YouTube videos can be added to the gallery. Once set, this value cannot be changed.
Check the Contributable box if the gallery is contributable so it will allow other users to add content to the gallery.
Under Gallery display, select the default Gallery focus. This option allows you to define what types of media are displayed by default. Users will have a dropdown list to change gallery focus when viewing a gallery.
Select from the Gallery view options.
Under Visibility, if you wish, Enable the date fields and specify a period in which students can only view the gallery.
Click Save changes to return to the collection’s home page and repeat steps until you have created all the sub galleries you want.
Adding items to your gallery
You can upload items to your gallery either singly or in bulk.
Files uploaded are stored in iLearn and videos if any are transcoded for streaming/playback in the web browser.
Click on the Media Collections link.
In the media collection(s) page, click the Actions menu icon for the gallery you want to add items to and click Edit gallery.
Click Add an item.
Add a Caption to name your image. This caption will appear alongside the item. If you opt to leave this blank, the filename (or URL) will be displayed as the caption instead.
Enter a Description if needed.
For Item display, specify if you want this item to be displayed in the gallery.
For Use as a thumbnail, specify if you want to use this item as the thumbnail in the gallery.
For Content, click Choose a file…
Click Upload a file and Browse to search for the image you wish to include.
Choose the relevant copyright for the item you want to upload.
Click Upload this file.
Choose a different Thumbnail image if required.
Add tags to label/organise your item.
In the Advanced section, complete the relevant fields.
Click Save changes .
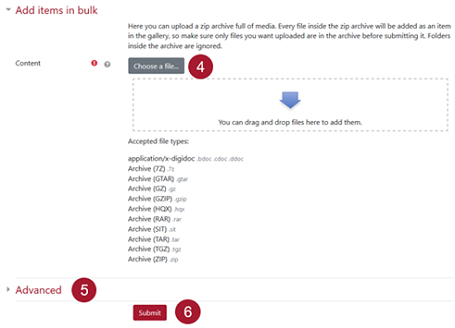
To add an item to a gallery in bulk
Click on the Media Collections link.
Click on the Action menu icon for the gallery you want to upload to and select Edit Gallery.
Click Add items in bulk.
Click Choose a file and select your zip file.
In the Advanced section, complete the relevant fields.
Click Submit.
Add an item to a YouTube gallery
YouTube galleries allow you to select and display videos that are available on YouTube.
Click on the Media Collections link.
Click Add an item.
Add a Caption to name your image. This caption will appear alongside the item. If you opt to leave this blank, the filename (or URL) will be displayed as the caption instead.
Enter a Description if needed.
For Item display, specify if you want this item to be displayed in the gallery.
For Use as a thumbnail, specify if you want to use this item as the thumbnail in the gallery.
For YouTube URL, paste a YouTube video URL.
Add tags to label/organise your item.
In the Advanced section, complete the relevant fields.
Click Save changes.
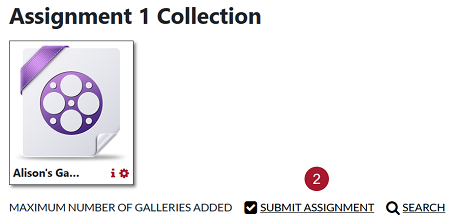
Submit your gallery to the assignment activity for grading
Once you have created your gallery you need to submit it to the Assignment.
Go back to your iLearn home page and click the link for the Media Collection again.
Click Submit Assignment.
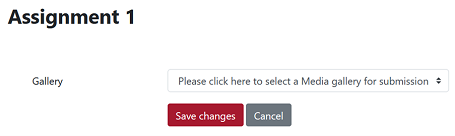
From the Gallery drop-down list, select your gallery.
Click Save changes.
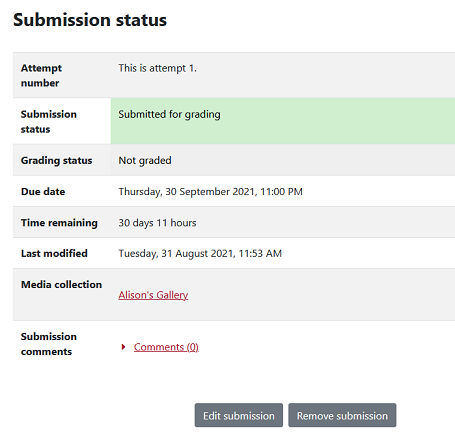
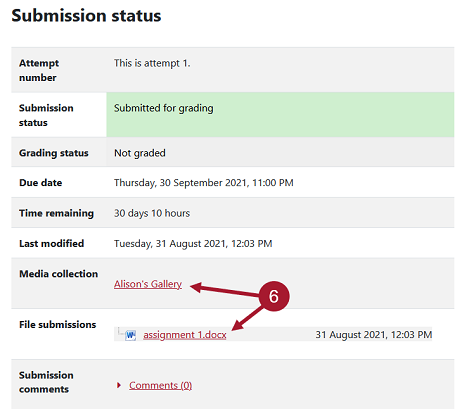
The Submission status will show the media collection that you selected.
Submit a gallery and a file for an assignment
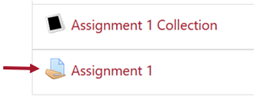
For an assignment, your convenor may ask you to submit a gallery as well as a file as part of your assessment.
Go back to your iLearn home page and click the link for the assignment.
Click Edit submission.
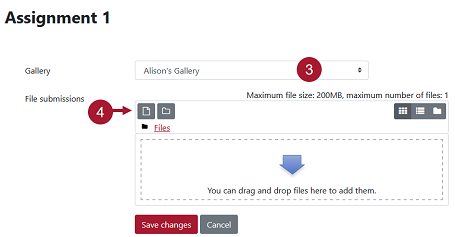
If you have not already selected your gallery, from the Gallery drop down list, select your gallery.
Click on the Add icon and on Browse to select your file to upload.
Click Save changes.
The Submission status will show the media collection and the file that you selected.


 .
.